
Building a Homelab & Cyber Range: The Quarantine Zone – A Safe Malware Analysis Lab
March 22, 2025
Welcome back to the Cyber Range and Homelab series! So far, we’ve built our command center on VLAN 1 and populated our network with a diverse set of targets across VLANs 10, 20, and 30. We can launch attacks, monitor for activity, and practice our response. But what happens when we want to analyze the payload itself?
Handling malware requires extreme caution. This isn’t a task to be taken lightly. One mistake can lead to an infection that compromises your entire lab, your host machine, or even your home network. That’s why a dedicated, fully isolated environment isn’t just a good idea—it’s an absolute necessity.
Today, I’ll walk you through my quarantine zone: a digital air-gapped lab built specifically for safely analyzing malicious code using tools like Flare VM and REMnux without risking anything else.
A Big, Fat, Important Disclaimer
WARNING: DANGEROUS TERRITORY AHEAD
Before we go any further, let’s be crystal clear: Do not handle live malware unless you are fully aware of the risks and have taken every precaution. This section of the lab is the most dangerous. A misconfiguration could have real-world consequences. The steps outlined here are designed to minimize risk, but risk can never be completely eliminated. Proceed with extreme caution.
Architecture of Isolation: The Digital Air-Gap
For our other networks, we used VLANs and firewall rules to create logical segmentation. For the malware lab, that’s not enough. We need to create a true air-gap at the hypervisor level. This means the analysis VMs will have absolutely no way to reach the internet or any other machine on our network by default.
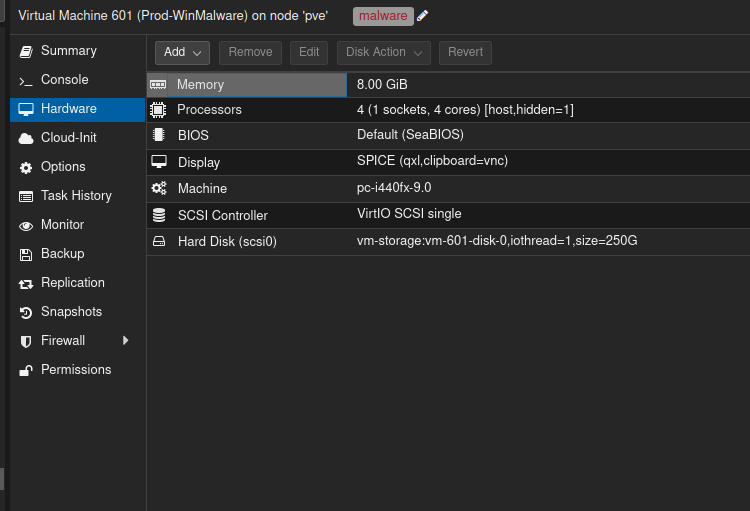
The implementation in Proxmox is deceptively simple: we build the VMs without a network card.
By completely removing the virtual network interface controller (NIC) from the VM’s hardware configuration, we remove any possibility of network communication. It’s the software equivalent of unplugging the Ethernet cable and smashing the port with a hammer.
Here is the hardware configuration for my Windows-based analysis machine, which will host Flare VM. Notice what’s missing.
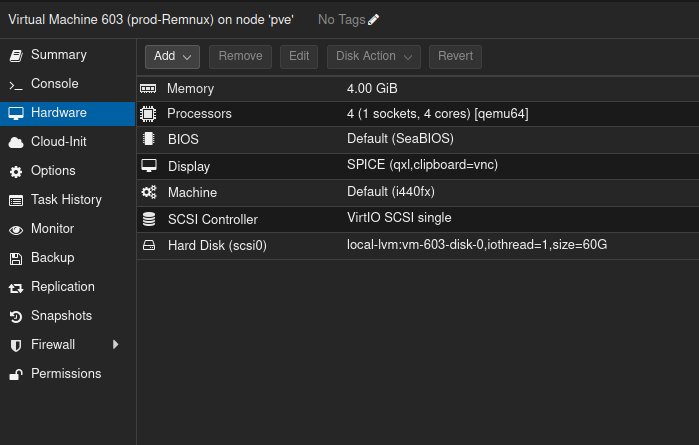
Similarly, my REMnux toolkit operates in the same isolated state, ensuring that no scripts or tools can accidentally reach out to the network.
The Tools of the Trade
Inside this isolated bubble, we have two primary analysis environments.
Flare VM: The Windows Analysis Powerhouse
Flare VM is a Windows-based security distribution created and maintained by Mandiant. It’s not an operating system itself, but rather a collection of PowerShell scripts that install a massive suite of the best free tools for malware analysis directly onto a Windows VM. This gives you a complete workshop for:
- Static Analysis: Examining malicious files without running them using tools like IDA Free, Ghidra, and PE-bear.
- Dynamic Analysis: Running the malware in a controlled environment and observing its behavior with debuggers like x64dbg and monitoring tools like ProcMon and Wireshark (for internal traffic).
My Prod-WinMalware VM is a Windows 10 machine ready to have Flare VM installed, or to serve as a clean “victim” to be infected and analyzed.
REMnux: The Linux RE Toolkit
REMnux is a Linux distribution based on Ubuntu that is packed with tools for reverse-engineering and malware analysis. While Flare VM excels at analyzing Windows executables, REMnux is fantastic for examining malicious documents, network traffic captures, and memory dumps, or for analyzing Linux-based malware. The two systems complement each other perfectly.
Simulating C2: The Private Internal Network
While a full air-gap is the safest starting point, some dynamic analysis requires the malware to believe it has a network connection to talk to its Command and Control (C2) server. To simulate this safely, we can create a completely private, internal-only network.
This is done by creating a new Linux Bridge in Proxmox (e.g., vmbr99) but—and this is the critical part—not attaching any physical NICs to it. It becomes a virtual switch that is connected to nothing in the physical world.
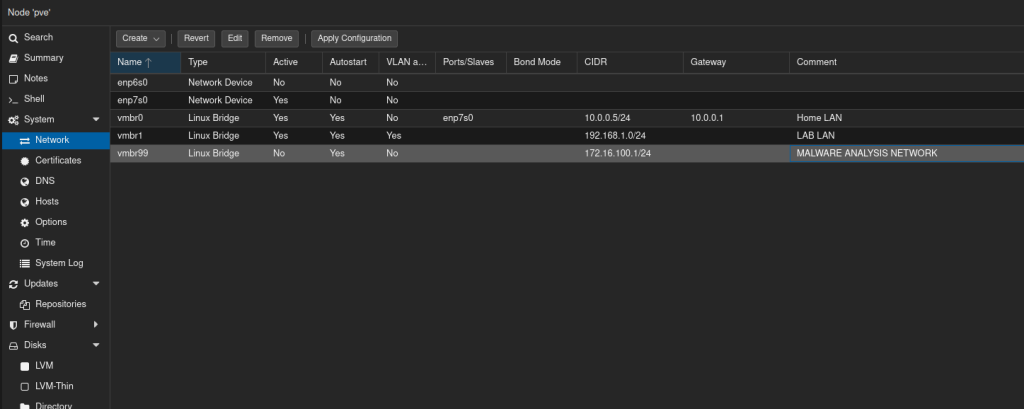
We can then add a network interface to both our Flare VM and REMnux VM and connect them only to this private bridge. This allows us to run a fake C2 server on REMnux (using a tool like INetSim) and have the malware running on Flare VM communicate with it, all while being completely sealed off from the outside world.
The Most Important Tool: Snapshots
The single most important feature for any malware analysis lab is the ability to use snapshots. The workflow is non-negotiable:
- Build the clean VMs (Windows + Flare VM, REMnux).
- Take a snapshot of this pristine, pre-analysis state.
- Perform the analysis. Transfer the malware sample, run it, and see what happens.
- Once finished, destroy the evidence. Do not save the infected state. Revert the VM to the clean snapshot.
This ensures that you start every analysis with a fresh, untainted system and that no remnants of the malware persist between sessions.
Final Thoughts
With our command center, our target ranges, and our quarantine zone complete, the lab is fully operational. We have a comprehensive environment that covers offensive techniques, defensive monitoring, and deep-dive analysis.