
Introduction
After running my WordPress site on DigitalOcean for several years, I decided to make the leap to self-hosting from my home lab. The motivation was simple: better control, reduced costs, and the flexibility to experiment with my infrastructure. However, self-hosting comes with its own challenges, particularly around security and reliability.
Enter Pangolin tunnel – a comprehensive solution that bridges the gap between local hosting and cloud accessibility. In this post, I’ll walk you through the entire migration process, from backing up your wordpress site from your droplet to setting up a secure, locally-hosted WordPress site accessible via Pangolin’s tunnel infrastructure.
Why Make the Switch?
Cost Considerations
Running a basic WordPress site on DigitalOcean typically costs $5-20+ per month depending on your droplet size. For a home lab enthusiast, this can add up quickly across multiple projects. Local hosting eliminates these recurring costs after the initial hardware investment and I’m already renting a vps for other homelab tunnels and have the hardware to host migrate my site.
Control and Flexibility
Local hosting provides complete control over your infrastructure stack. You can experiment with different configurations, install custom software, and optimize performance without provider restrictions.
Learning Opportunity
Managing your own infrastructure is an invaluable learning experience, especially for security professionals and developers who want to understand the full stack.
Understanding Pangolin Tunnel
Pangolin tunnel is a sophisticated tunneling solution that includes several key components:
- Traefik: Modern reverse proxy and load balancer with automatic SSL/TLS termination
- Gerbil: Lightweight tunnel client that maintains persistent connections
- CrowdSec: Community-driven security engine that provides real-time threat detection and response
This stack provides enterprise-grade security and reliability for self-hosted applications.
Prerequisites
Before starting the migration, ensure you have:
- A VPS for the tunnel endpoint (I recommend a small instance from Hetzner, Linode, or Vultr)
- Local hardware capable of running Docker containers
- Domain name with DNS control pointed at your VPS
- SSH access to your current DigitalOcean droplet
- Basic familiarity with Docker and command line operations
Phase 1: Backing Up Your DigitalOcean WordPress Site
To do this we are going to use a plugin for wordpress to export our website.
Installing the Export Plugin
- Log into your DigitalOcean WordPress admin panel
https://your-domain.com/wp-admin- Install All-in-One WP Migration Plugin
- Navigate to Plugins → Add New
- Search for “All-in-One WP Migration”
- Install and activate the plugin
- Also install the “All-in-One WP Migration Unlimited Extension” if you have a large site
- Create Full Site Export
- Go to All-in-One WP Migration → Export
- Select “Export To” → File
- The plugin will create a complete backup including:
- Database content
- Media files
- Themes and plugins
- WordPress configuration
- Download the Export File
- Once the export completes, download the .wpress file
- This file contains your entire WordPress installation
Alternative Manual Backup Method
If you prefer manual backups or the plugin method doesn’t work:
# SSH into your DigitalOcean droplet
ssh root@your-droplet-ip

# Create backup directory
mkdir ~/wordpress-backup
cd ~/wordpress-backup

# Backup WordPress files
tar -czf wordpress-files-$(date +%Y%m%d).tar.gz /var/www/html/

# Export MySQL database
mysqldump -u root -p wordpress_db > wordpress-db-$(date +%Y%m%d).sql

# Download files to your local machine
scp root@your-droplet-ip:~/wordpress-backup/* ./Phase 2: Setting Up Local WordPress Environment
I use Proxmox and will be using an LXC from Proxmox Helper Scripts which can be found here:
https://community-scripts.github.io/ProxmoxVE/scripts?id=wordpress
Installing WordPress LXC Container
- Run the Proxmox Helper Script
    # In your Proxmox shell
bash -c "$(wget -qLO - https://github.com/community-scripts/ProxmoxVE/raw/main/ct/wordpress.sh)"- Configure Container Settings
- Container ID: Choose an available ID
- Hostname: wordpress-prod
- Storage: local-lvm (or your preferred storage)
- Memory: 2048MB (adjust based on your needs)
- CPU Cores: 2
- Network: Bridge to your LAN
- Complete Initial Setup The script will automatically install:
- Ubuntu LTS base
- Apache2 web server
- MySQL database
- PHP with required extensions
- WordPress latest version
WordPress Configuration
After the container is created and started:
- Access WordPress Setup
http://container-ip-address- Complete WordPress Installation
- Set site title and description
- Create admin user account
- Configure database connection (usually pre-configured by the script)
- Install Import Plugin
- Go to Plugins → Add New
- Search and install “All-in-One WP Migration”
- Activate the plugin
- Import Your Site
- Navigate to All-in-One WP Migration → Import
- Upload your .wpress file from Phase 1
- Click “Import” and wait for completion
- The plugin will restore all content, settings, and media
Post-Import Configuration
After importing your site, you’ll need to update several settings:
- Update Site URLs
    # SSH into your WordPress container
    lxc-attach -n [container-id]

    # Use WP-CLI to update URLs
    cd /var/www/html
    wp search-replace 'https://old-domain.com' 'http://container-ip' --dry-run
wp search-replace 'https://old-domain.com' 'http://container-ip'- Configure WordPress for Reverse Proxy Add these lines to
wp-config.php:
    # Edit wp-config.php
nano /var/www/html/wp-config.phpAdd before “That’s all, stop editing!”:
    // Configure for reverse proxy
    define('FORCE_SSL_ADMIN', true);

    // Handle reverse proxy headers
    if (strpos($_SERVER['HTTP_X_FORWARDED_PROTO'], 'https') !== false) {
        $_SERVER['HTTPS'] = 'on';
    }

    // Trust proxy headers
    if (isset($_SERVER['HTTP_X_FORWARDED_HOST'])) {
        $_SERVER['HTTP_HOST'] = $_SERVER['HTTP_X_FORWARDED_HOST'];
    }

    // Define home and site URLs dynamically
    $protocol = (!empty($_SERVER['HTTPS']) && $_SERVER['HTTPS'] !== 'off') ? 'https://' : 'http://';
    $host = $_SERVER['HTTP_HOST'];
    define('WP_HOME', $protocol . $host);
    define('WP_SITEURL', $protocol . $host);
- Update Permalink Structure
- Go to Settings → Permalinks
- Re-save your permalink structure to regenerate .htaccess rules
Phase 3: VPS Setup and Hardening
For this it’s a very easy installation – we are going to start with using the install script from Pangolin themselves.
Initial VPS Configuration
Start with a minimal Ubuntu or Debian VPS. Here’s the essential hardening checklist:
SSH Security
# Generate a new SSH key pair on your local machine
ssh-keygen -t ed25519 -C "your_email@example.com"

# Copy your public key to the VPS
ssh-copy-id root@your-vps-ip

# Edit SSH configuration
nano /etc/ssh/sshd_configKey SSH hardening settings:
Port 2222                    # Change default port
PermitRootLogin no          # Disable root login
PasswordAuthentication no   # Disable password auth
PubkeyAuthentication yes    # Enable key-based auth
MaxAuthTries 3             # Limit auth attempts
ClientAliveInterval 300    # Timeout idle connections
ClientAliveCountMax 2Firewall Configuration
# Install and configure UFW
apt update && apt install ufw

# Default policies
ufw default deny incoming
ufw default allow outgoing

# Allow SSH on custom port
ufw allow 2222/tcp

# Allow HTTP/HTTPS
ufw allow 80/tcp
ufw allow 443/tcp

# Enable firewall
ufw enableFail2Ban Setup
# Install Fail2Ban
apt install fail2ban

# Create custom configuration
cp /etc/fail2ban/jail.conf /etc/fail2ban/jail.local

# Edit configuration
nano /etc/fail2ban/jail.localKey Fail2Ban settings:
[DEFAULT]
bantime = 3600
findtime = 600
maxretry = 3

[sshd]
enabled = true
port = 2222
filter = sshd
logpath = /var/log/auth.log
maxretry = 3System Updates and Monitoring
# Enable automatic security updates
apt install unattended-upgrades
dpkg-reconfigure -plow unattended-upgrades

# Install monitoring tools
apt install htop iotop nethogs

# Set up log rotation
nano /etc/logrotate.d/customPhase 4: Pangolin Tunnel Setup
Installing Pangolin Components
- Download and Run Installation Script
    adduser --system --group --home /opt/pangolin pangolin

    # Switch to pangolin directory
    cd /opt/pangolin

    # Download installation script
    wget https://get.pangolin.com/install.sh
    chmod +x install.sh

    # Run installation
sudo ./install.shFollow the installer guide that shows up with pangolin, its very easy to set up and most of the default options are the correct one, I will be using crowdsec (not included in the default set up) but the rest will do the same
Using Newts and connecting to sites and resources with Pangolin
First thing you want to do is install a newt on the device where wordpress is now hosted. go to sites and create a new site, I love docker containers and the newt tunnel is preferable to wireguard so that is what I will be using
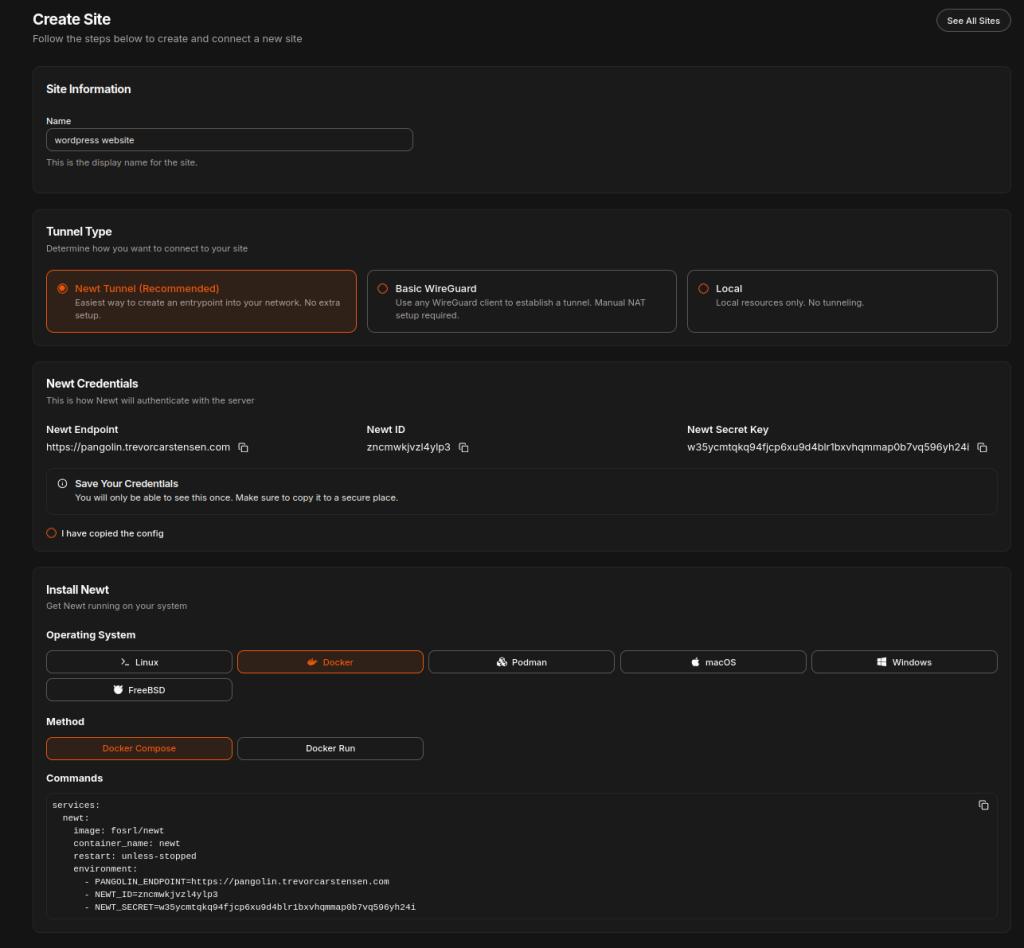
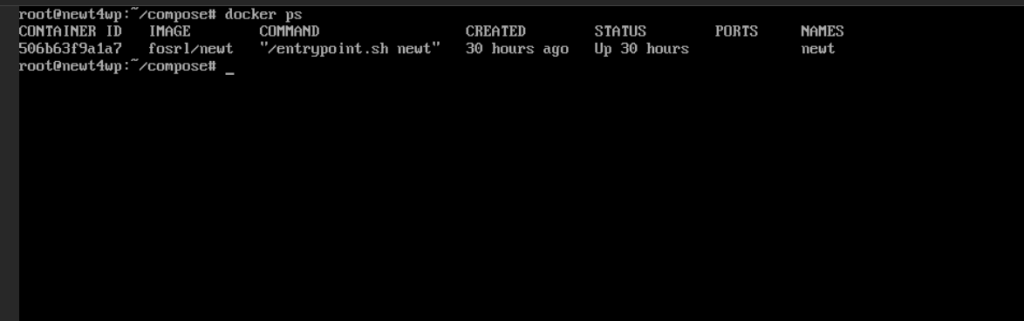
Copying the compose file and creating a docker container within another Debian lxc built to host containers available from the proxmox helper scripts repo allows me to have a lightweight newt not bound to other resources.
Now jumping back into the Pangolin management interface we can set the new newt as the resource and set up a new site
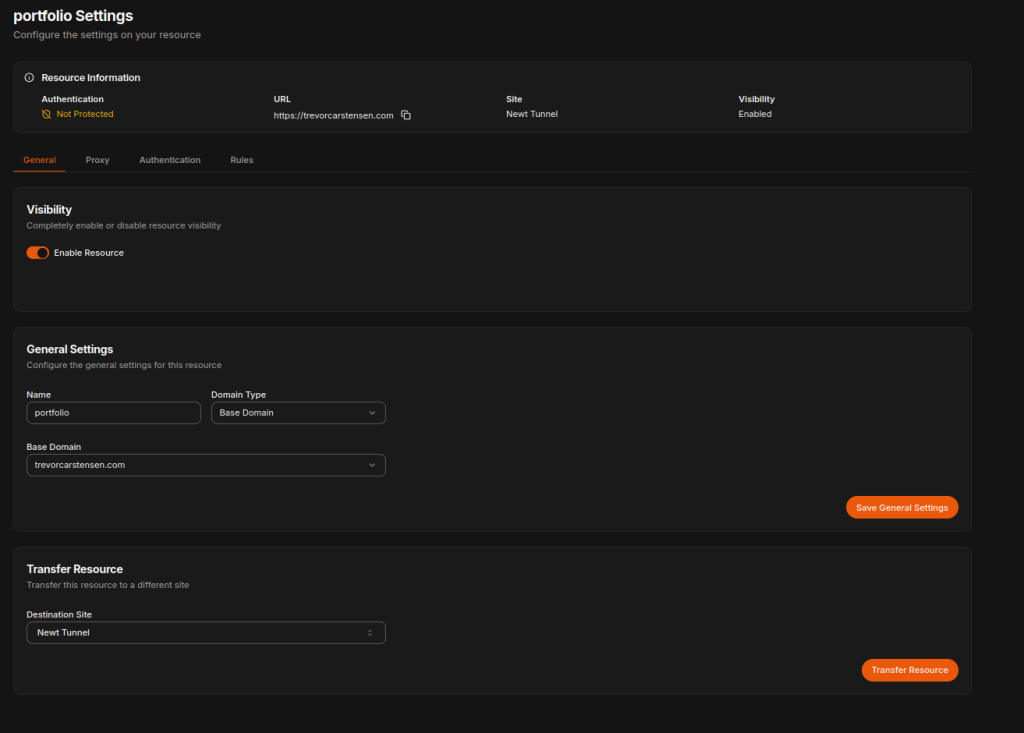
Starting with the general settings then setting up the IP address that my word press site is hosted locally at
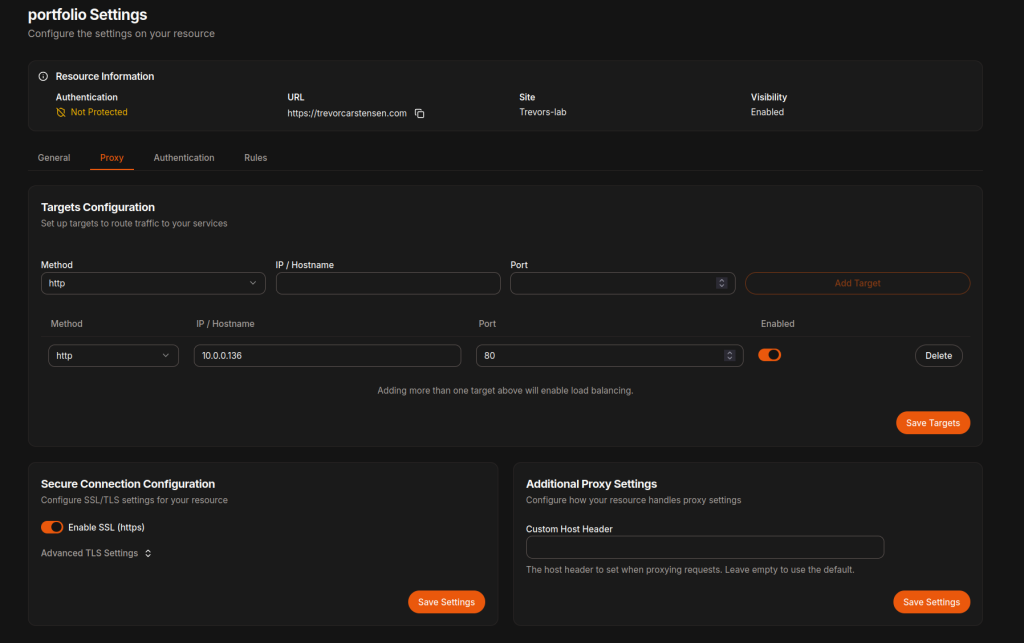
Clicking save and waiting a few seconds and the site should be live again!!!
SSL Certificate Automation
Traefik will automatically handle SSL certificates through Let’s Encrypt. Ensure your Traefik configuration includes:
certificatesResolvers:
  letsencrypt:
    acme:
      email: your-email@domain.com
      storage: /data/acme.json
      httpChallenge:
entryPoint: webWait for DNS propagation (can take up to 48 hours but usually 15-30 minutes) before testing SSL certificate generation.
Phase 6: Testing and Optimization
Performance Testing
Use tools like Apache Bench or wrk to test your setup:
# Test concurrent connections
ab -n 1000 -c 10 https://yourdomain.com/

# Advanced testing with wrk
wrk -t12 -c400 -d30s https://yourdomain.com/

# Monitor resource usage
htopSecurity Validation
Verify your security setup:
# Check SSL configuration
nmap --script ssl-enum-ciphers -p 443 yourdomain.com

# SSL Labs test (online)
# Visit: https://www.ssllabs.com/ssltest/

# Verify firewall rules
ufw status verbose

# Check CrowdSec status
sudo cscli metrics
sudo cscli alerts list

# Test security headers
curl -I https://yourdomain.comBackup Strategy
I am personally just going to use Proxmox’s snapshot and backup features, but here’s a way you can backup your WordPress website if you wanted to:
#!/bin/bash
# backup-wordpress.sh

DATE=$(date +%Y%m%d_%H%M%S)
BACKUP_DIR="/backup/wordpress"
CONTAINER_ID="your-wordpress-container-id"

# Create backup directory
mkdir -p "$BACKUP_DIR"

# Database backup
lxc-attach -n $CONTAINER_ID -- mysqldump -u root -p wordpress > "$BACKUP_DIR/db_$DATE.sql"

# Files backup
tar -czf "$BACKUP_DIR/files_$DATE.tar.gz" /var/lib/lxc/$CONTAINER_ID/rootfs/var/www/html/

# WordPress exports via WP-CLI
lxc-attach -n $CONTAINER_ID -- wp db export - --path=/var/www/html > "$BACKUP_DIR/wp_db_$DATE.sql"

# Cleanup old backups (keep last 7 days)
find "$BACKUP_DIR" -name "*.sql" -mtime +7 -delete
find "$BACKUP_DIR" -name "*.tar.gz" -mtime +7 -delete

# Create Proxmox snapshot
vzdump $CONTAINER_ID --mode snapshot --storage localSecurity Monitoring
Set up alerts for security events:
# CrowdSec alerts
sudo cscli alerts list -o json | jq '.[] | select(.scenario == "crowdsecurity/ssh-bf")'

# Failed login monitoring
grep "authentication failure" /var/log/auth.log | tail -10

# Monitor WordPress login attempts
lxc-attach -n [container-id] -- tail -f /var/log/apache2/access.log | grep wp-loginConclusion
Migrating from DigitalOcean to local hosting with Pangolin tunnel provides significant benefits in terms of cost savings, control, and learning opportunities. The combination of Traefik, Gerbil, and CrowdSec creates a robust, secure infrastructure that rivals cloud providers while maintaining the flexibility of self-hosting.
Key takeaways from this migration:
- Proper security hardening is essential for VPS endpoints
- Automated SSL certificate management simplifies HTTPS deployment
- CrowdSec provides community-driven security intelligence
- Regular monitoring and maintenance ensure optimal performance
- Backup strategies are crucial for disaster recovery
The initial setup requires some technical expertise, but the long-term benefits make it worthwhile for those comfortable with infrastructure management. With proper configuration and monitoring, your self-hosted WordPress site can achieve excellent performance and security standards.
Additional Resources
- Pangolin Documentation
- Traefik Configuration Guide
- CrowdSec Hub
- WordPress Security Best Practices
- VPS Security Hardening Checklist
- Proxmox Helper Scripts
Remember to regularly update all components and stay informed about security best practices to maintain a secure and reliable hosting environment.